Am I too late with this months look through White Dwarf? Probably. Those of you who wanted to know about the second part of the Codex: Sisters of Battle will have already found out all you need to know about it, so Ill keep this short and brief.
This months issue is largely devoted to Warhammer and the Ogre Kingdoms. There is of course the second part of the Sisters of Battle Codex alongside a two-page article on the Court of the Archon, which shows off the new models available to the Dark Eldar (Lhamaean, Medusae, Sslyth and Ur-Ghul).
Reviews of the Sisters of Battle Codex can be found all of the internet, for instance here at 3++ is the new black. While being an interesting read, the codex hasn't made me want to go out and start using a SoB army. However, having read through the Dark Eldar codex, I am quite keen to begin a Haemonculus based army, but that's a story for another day.
As this is so late in being posted up, I feel it is safe to post up the result of the Sisters of Battle v Tyranid battle, which saw the SoB win by two objectives to one. Nice to see my prediction from last months White Dwarf was correct. No idea what's coming up in next months issue, so I will have to wait a few more days and hope for an interesting surprise!
Warhammer 40k blog for the playing of various armies and everything in between.
Thursday, 29 September 2011
Monday, 26 September 2011
Space Wolves v Imperial Guard. Report 5
After a short hiatus, I am back. I have also used the time away to have a think about the layout of these battle reports and how to revamp them a little to make it easier to find the important points of the battle from the mundane. We'll have to see how that works out as I do tend to waffle a little and if I do, someone please shout at me!
My return to the battlefields saw my Space Wolves against an Imperial Guard army of which I do not have a copy of the list used. I shall therefore just run through the army list I used. The battle was a 2,000 point battle to the death or, as actually occurred, our time ran out and had to judge the contest on kill points.
Space Wolves - 2000pts.
Logan Grimnar
Rune Priest - Runic Armour, Chooser of the Slain, Murderous Hurricane, Tempests Wrath
Wolf Scouts - 6 men, Meltagun
Wolf Guard - Arjac Rockfist
TDA, Combi-Melta, Wolf Claw
TDA, Combi-Melta, Power Fist
TDA, Storm Bolter, Power Fist
TDA, Storm Bolter, Power Weapon, Cyclone Missile Launcher
Grey Hunters 1 - Meltagun, Standard, Power Fist, Rhino
Grey Hunters 2 - Flamer, Standard, Power Weapon, Drop Pod
Grey Hunters 3 - Flamer, Standard, Drop Pod
Grey Hunters 4 - Meltagun, Standard, Rhino
Land Speeder x2 - Multi-Melta, Heavy Flamer
Long Fangs - 3 x Missile Launcher, 2 x Lascannon.
Deployment
The Imperial Guard deploy first, spreading their numbers across their table edge, with high numbers of troops flanking four Leman Russ tanks, of which two were part of a squadron and the other two were lone tanks.
The Space Wolves deployment saw one Land Speeder deployed along with both of the Rhinos and the squad of Long Fangs. All of these units were deployed to the right hand flank of the Wolves and mostly covered by a lone building in the their deployment area.
The Space Wolves steal the initiative and the drop pods fall to start things off.
Let Battle Commence
The aim with the drop pods was to strike hard and fast at the tanks lined up in the middle of the Guard deployment. The first pod with Logan and Wolf Guard came down exactly where required, immobilising and therefore destroying one tank of the squadron, while the other tank was left unable to shoot the following turn. The second pod scattered far enough away to keep Arjacs hammer from reaching it, leaving two active tanks on the loose, which wasn't part of my initial plan, but ultimately not too far away.
Heavy Weapons fire from the Long Fangs was sent in two directions - frag missiles at the troops while the lascannons tried unsuccessfully to damage the tanks further. The rhinos moved forward toward the main nucleus of Guard troops and popped some smoke, while the Land Speeder used the tanks as cover.
One thing to learn about terminators is that if they face enough firepower, whether it is AP2 or not, eventually they will fall if faced with massed guns. This was their downfall. As for Arjacs pod, he lost pretty much all of his squad thanks to plasma cannons on the tank I had hoped they would destroy. It is a pretty big hope to try and land a drop pod within 6" of its target. Fortune certainly didn't favour the brave at this point.
Back on the right flank, one rhino was immobilised, the other one still fully operational. By the start of the third turn all Space Wolf reserves had arrived. The Scouts came in behind a few of the troops, shooting then assaulting then sweeping the squad before them for the loss of one man. The command squad fell to flamer and bolter fire, with a heavy weapon squad falling in an identical manner.
After the initial barrage his squad had taken, Arjac fought back resolutely, blowing the battle cannon off of a Leman Russ, and surviving concentrated fire from every conceivable weapon on the table from lascannons and plasma cannons to lasguns and rifles. Shame he ended up losing a wound to a las pistol in the end, but he still showed his titanic might enough to be proud of his performance.
Logan wasn't so lucky, while after smashing off a plasma cannon, died to a quick round of shooting along side his Wolf Guard. It was a fairly quick demise for my flagship drop pod, especially one that cost in the region of 400pts. The lesson here is not to leave any unit, no matter its size, isolated for any period of time, especially in an open location where fire can be easily concentrated upon them.
One Land Speeder was also reduced to scrap metal by a Leman Russ, as a deep striking squad of Storm Troopers attempted to land close enough to the Long Fangs to take them out. The squad scattered out of range and was quickly eliminated the following turn by the remaining Long Fangs with frag missiles and lascannon fire.
The game ended on turn 4 due to time constraints. The result, based on kill points, was a 5-2 victory in favour of the Wolves. The main lessons learnt from this encounter are that distance with the Imperial Guard must be closed down rapidly (drop pods help with this immensely, maybe bikes would also be beneficial in this aspect too), isolated units will generally equal dead units pretty quickly, and Arjac with his 2+/3++ save is pretty difficult to fell.
My return to the battlefields saw my Space Wolves against an Imperial Guard army of which I do not have a copy of the list used. I shall therefore just run through the army list I used. The battle was a 2,000 point battle to the death or, as actually occurred, our time ran out and had to judge the contest on kill points.
Space Wolves - 2000pts.
Logan Grimnar
Rune Priest - Runic Armour, Chooser of the Slain, Murderous Hurricane, Tempests Wrath
Wolf Scouts - 6 men, Meltagun
Wolf Guard - Arjac Rockfist
TDA, Combi-Melta, Wolf Claw
TDA, Combi-Melta, Power Fist
TDA, Storm Bolter, Power Fist
TDA, Storm Bolter, Power Weapon, Cyclone Missile Launcher
Grey Hunters 1 - Meltagun, Standard, Power Fist, Rhino
Grey Hunters 2 - Flamer, Standard, Power Weapon, Drop Pod
Grey Hunters 3 - Flamer, Standard, Drop Pod
Grey Hunters 4 - Meltagun, Standard, Rhino
Land Speeder x2 - Multi-Melta, Heavy Flamer
Long Fangs - 3 x Missile Launcher, 2 x Lascannon.
Deployment
The Imperial Guard deploy first, spreading their numbers across their table edge, with high numbers of troops flanking four Leman Russ tanks, of which two were part of a squadron and the other two were lone tanks.
The Space Wolves deployment saw one Land Speeder deployed along with both of the Rhinos and the squad of Long Fangs. All of these units were deployed to the right hand flank of the Wolves and mostly covered by a lone building in the their deployment area.
The Space Wolves steal the initiative and the drop pods fall to start things off.
Let Battle Commence
The aim with the drop pods was to strike hard and fast at the tanks lined up in the middle of the Guard deployment. The first pod with Logan and Wolf Guard came down exactly where required, immobilising and therefore destroying one tank of the squadron, while the other tank was left unable to shoot the following turn. The second pod scattered far enough away to keep Arjacs hammer from reaching it, leaving two active tanks on the loose, which wasn't part of my initial plan, but ultimately not too far away.
Heavy Weapons fire from the Long Fangs was sent in two directions - frag missiles at the troops while the lascannons tried unsuccessfully to damage the tanks further. The rhinos moved forward toward the main nucleus of Guard troops and popped some smoke, while the Land Speeder used the tanks as cover.
One thing to learn about terminators is that if they face enough firepower, whether it is AP2 or not, eventually they will fall if faced with massed guns. This was their downfall. As for Arjacs pod, he lost pretty much all of his squad thanks to plasma cannons on the tank I had hoped they would destroy. It is a pretty big hope to try and land a drop pod within 6" of its target. Fortune certainly didn't favour the brave at this point.
Back on the right flank, one rhino was immobilised, the other one still fully operational. By the start of the third turn all Space Wolf reserves had arrived. The Scouts came in behind a few of the troops, shooting then assaulting then sweeping the squad before them for the loss of one man. The command squad fell to flamer and bolter fire, with a heavy weapon squad falling in an identical manner.
After the initial barrage his squad had taken, Arjac fought back resolutely, blowing the battle cannon off of a Leman Russ, and surviving concentrated fire from every conceivable weapon on the table from lascannons and plasma cannons to lasguns and rifles. Shame he ended up losing a wound to a las pistol in the end, but he still showed his titanic might enough to be proud of his performance.
Logan wasn't so lucky, while after smashing off a plasma cannon, died to a quick round of shooting along side his Wolf Guard. It was a fairly quick demise for my flagship drop pod, especially one that cost in the region of 400pts. The lesson here is not to leave any unit, no matter its size, isolated for any period of time, especially in an open location where fire can be easily concentrated upon them.
One Land Speeder was also reduced to scrap metal by a Leman Russ, as a deep striking squad of Storm Troopers attempted to land close enough to the Long Fangs to take them out. The squad scattered out of range and was quickly eliminated the following turn by the remaining Long Fangs with frag missiles and lascannon fire.
The game ended on turn 4 due to time constraints. The result, based on kill points, was a 5-2 victory in favour of the Wolves. The main lessons learnt from this encounter are that distance with the Imperial Guard must be closed down rapidly (drop pods help with this immensely, maybe bikes would also be beneficial in this aspect too), isolated units will generally equal dead units pretty quickly, and Arjac with his 2+/3++ save is pretty difficult to fell.
Wednesday, 17 August 2011
Death from Above - Drop Podding
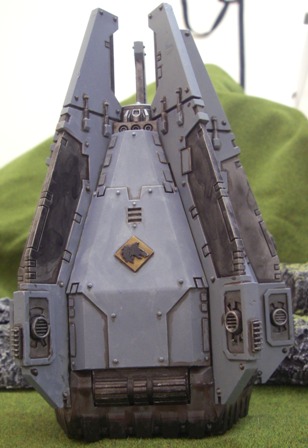
My favourite method of delivery for any list I have ever written always lands upon the drop pod. Crashing down amongst your enemy, very little to worry about with the auto-correct on the scatter meaning no mishap table to fret over, and half your pods dropping on turn one, what more can you ask for?
With the pods coming down in your opening turn you can surgically strike with the aim of dividing your opponents army, singling out important elements and laying down some fire before your turn is out, the heart stopping moment waiting to determine whether your pod hits the target you need, or scatters either into further danger or, conversely, further away from danger is a definite highlight for the risk-taker in me.
But how can you use the pods effectively and not just waste your armies potential? For me, making a successful drop pod based army relies on three things and we will look at these in turn shortly. The amount of fire power you have walking out of your pods is entirely up to you, I only want to talk about the potential usage and tactics you can employ if you want to go down the route of using drop pods.
Firstly you have to use as many pods as you can possible take, preferably using an odd numbered amount of pods, just to use the special rule that 'half of all drop pods, rounded up, are to drop in the players first turn'. So seven pods in total will see 4 fall in the first turn. If all those pods are full of men, you have potentially 40 power armoured men entering first turn anywhere on the board. If you're playing crazy, that could also be 20 men in terminator armour, or any combination between the two scenarios. I think its fair to say that is a fair amount of fire power to place around the board.
Secondly you have to consider where you are going to attempt to land them and what your objectives are. A singular pod which is dropped in the middle of the enemy will not last much further than its first turn on the table. Of course, if that pod has a special aim like using its melta gun to open up a tank and you don't mind using the troops as cannon fodder, that's all fine, but I prefer to try keeping my guys alive as long as possible. Landing multiple pods close together will increase their individual survivability as your opponent will have more targets to split their fire between, meaning your troops will be taking less damage. The more pods you have drop in one area, the greater their chances of survival are.
And lastly you will also have to consider the units that make up the rest of your army. While you are podding in your troops, your heavy support needs to be able to cover them wherever they may land, taking on any vehicles and monstrous creatures that are near the landing zone. You may also consider using your fast attack, such as bikers or land speeders, to provide further cover, using their increased movement range to get forward and support your troops on foot. These units will also add an additional threat to your opponent and will help to divert some fire away from your drop pod troops.
This type of army is certainly an acquired taste, but when it works can be devastating. Never drop a pod so that it is left at risk of being isolated and exposed to an angry enemy and always make sure that each pod is adequately supported by other pods, bikes or speeders, heavy weapons squads and tanks or outflanking scouts and this type of army can be lethal to your opponent. Let me know your thoughts on drop pod armies and how you make them work.
With the pods coming down in your opening turn you can surgically strike with the aim of dividing your opponents army, singling out important elements and laying down some fire before your turn is out, the heart stopping moment waiting to determine whether your pod hits the target you need, or scatters either into further danger or, conversely, further away from danger is a definite highlight for the risk-taker in me.
But how can you use the pods effectively and not just waste your armies potential? For me, making a successful drop pod based army relies on three things and we will look at these in turn shortly. The amount of fire power you have walking out of your pods is entirely up to you, I only want to talk about the potential usage and tactics you can employ if you want to go down the route of using drop pods.
Firstly you have to use as many pods as you can possible take, preferably using an odd numbered amount of pods, just to use the special rule that 'half of all drop pods, rounded up, are to drop in the players first turn'. So seven pods in total will see 4 fall in the first turn. If all those pods are full of men, you have potentially 40 power armoured men entering first turn anywhere on the board. If you're playing crazy, that could also be 20 men in terminator armour, or any combination between the two scenarios. I think its fair to say that is a fair amount of fire power to place around the board.
Secondly you have to consider where you are going to attempt to land them and what your objectives are. A singular pod which is dropped in the middle of the enemy will not last much further than its first turn on the table. Of course, if that pod has a special aim like using its melta gun to open up a tank and you don't mind using the troops as cannon fodder, that's all fine, but I prefer to try keeping my guys alive as long as possible. Landing multiple pods close together will increase their individual survivability as your opponent will have more targets to split their fire between, meaning your troops will be taking less damage. The more pods you have drop in one area, the greater their chances of survival are.
![]() |
| From Counterfetts blog, All Things Fett. |
This type of army is certainly an acquired taste, but when it works can be devastating. Never drop a pod so that it is left at risk of being isolated and exposed to an angry enemy and always make sure that each pod is adequately supported by other pods, bikes or speeders, heavy weapons squads and tanks or outflanking scouts and this type of army can be lethal to your opponent. Let me know your thoughts on drop pod armies and how you make them work.
Thursday, 11 August 2011
White Dwarf 380 - August 2011
The monthly look through White Dwarf is back. It's another useful edition of the magazine for both Warhammer Fantasy and 40k players alike, especially those with an interest in Vampire Counts for WHFB and Sisters of Battle for 40k.
The Fantasy element of the magazine contributes around 75% of its overall content this month. On top of new rules for the Terrorgheist, Tomb Banshee and Cairn Wraith in the Vampire Counts range, there are also additional rules for a new Garden of Morr plastic scenery kit that is also due to be released. Following this you have numerous army lists followed up by a battle report which sees The Empire go up against Vampire Counts.
To complete the Warhammer section there is then a showcase from the 'Eavy Metal team of the various new monsters that were released alongside last months Storm of Magic, followed by an extensive tutorial for the assembly and painting of a Black Dragon.
And then we find the first part of the Sisters of Battle Codex, situated toward the rear of the magazine and filling 14 pages with information on the Adepta Sororitas. While I could not see any new models and cannot comment on whether the information held within this first section is completely brand new, the codex this far makes for interesting reading. The named characters appear to have had a couple of stats boosted, but until we have the second part it is too early to tell what a SoB army will generally comprise and how they can fair on the table.
In other news from this issue of WD, the Dark Eldar have two more new releases due on the 20th August in the shape of Ur-Ghul and Medusae (seen below) and a Chaos Daemons Battalion/Battleforce due to be released the same day.
Hopefully my copy of White Dwarf will turn up on time this month and the full strength of the Sisters of Battle will be shown in a battle report when up against Hive Fleet Leviathan. I'm putting my money on a SoB victory on that one, so we will have to wait and see!
The Fantasy element of the magazine contributes around 75% of its overall content this month. On top of new rules for the Terrorgheist, Tomb Banshee and Cairn Wraith in the Vampire Counts range, there are also additional rules for a new Garden of Morr plastic scenery kit that is also due to be released. Following this you have numerous army lists followed up by a battle report which sees The Empire go up against Vampire Counts.
To complete the Warhammer section there is then a showcase from the 'Eavy Metal team of the various new monsters that were released alongside last months Storm of Magic, followed by an extensive tutorial for the assembly and painting of a Black Dragon.
And then we find the first part of the Sisters of Battle Codex, situated toward the rear of the magazine and filling 14 pages with information on the Adepta Sororitas. While I could not see any new models and cannot comment on whether the information held within this first section is completely brand new, the codex this far makes for interesting reading. The named characters appear to have had a couple of stats boosted, but until we have the second part it is too early to tell what a SoB army will generally comprise and how they can fair on the table.
In other news from this issue of WD, the Dark Eldar have two more new releases due on the 20th August in the shape of Ur-Ghul and Medusae (seen below) and a Chaos Daemons Battalion/Battleforce due to be released the same day.
Hopefully my copy of White Dwarf will turn up on time this month and the full strength of the Sisters of Battle will be shown in a battle report when up against Hive Fleet Leviathan. I'm putting my money on a SoB victory on that one, so we will have to wait and see!
Wednesday, 10 August 2011
The Army List Series Part Two - Creating Your Lists
Where is the best place to start when looking to put together your list for an upcoming battle? There is no right or wrong place to start, but it is worth having a good idea about what you want your army to achieve before you begin putting it together. The aim of this segment is not to tell you what units you must have in your army, but is more of vocalised thought process of what you could consider whilst preparing an army list.
In the opening part of this series, found here, there are a few different builds you can go for.Each list you create you would like to think had a chance of victory given a bit of luck and sound tactics and so I believe that a solid approach to writing any sort of list can at least get you moving in the right direction.
Whether you are confined in your list to what models you have available, or if you have the freedom of being able to use a large amount of 'counts as' models, each and every unit within that list needs to be in some way compatible with the next.
To start with a good knowledge base of your army in general is a must, knowing their strength and weaknesses such that you can then aim to reduce weaknesses while maximising the strengths. For instance, Dark Eldar are exceptional in close combat, while poor at range, while Tau and Necrons rely more on their fire power generally than slicing the opposition up in hand to hand fights and as such these armies will be aligned accordingly.
Knowing your army should happen eventually regardless of whether or not you spend every second studying your army's codex. Knowing your opponents army is a whole other kettle of fish but, simplistically, can be generalised down to help you with your army. Going against horde armies, you want to be packing as many template weapons as possible, while against Marines and similar, plasma weapons and other high AP weaponry is a must, while for mechanised armies you may want to also consider high strength weaponry as well to help blast through that armour. Helpful advice I read somewhere is to always shoot the choppy stuff and chop the shooty stuff.
Once you have considered your army's weaponry you need to think about their delivery system to the forth coming battle. Deep striking elements of your army on to the table, in drop pods for example, could leave units isolated and destroyed within a turn of arriving. So you either need to allow for more units to deep strike with them, enough long range guns to cover them or have fast moving units move to their position to support them. Either way your list will have to accommodate these factors.
Of course, deep striking armies aren't the only way to have your army. If you want to be assaulting as quickly as possible, you need vehicles and mechanisms that allow you to achieve that. However, sending a lone Land Raider up against your enemy will most likely see that Land Raider wrecked before it gets close enough. Sending two would increase both their chances of surviving but the points cost would be very high, but with an improved chance of at least one of them hitting home.
You may also try the foot slogging approach, but to me this relies heavily on their being plenty of cover on the table and units that can move quickly and face up to a lot of shooting before they get into position. For a foot slogging army you will need plenty of ranged fire power to provide covering fire and to find all the cover available, possible using cheaper units to shield your more expensive units running behind them.
A good, solid army list will not be created without some experimentation, but this very experimentation can lead to many a situation where you can discover more about your army than you thought you knew. An army list compiled with a particular aim (with a back up just in case!) will have more success than a random collection of units that combine with multiple objectives in mind. It makes sense when written down, but how many people starting out would have one maybe two units running around on their own trying to flatten their opponent, while having the rest of the army sit back and try picking things off at range, just to see their whole army get wiped out pretty quickly? Possibly not that many, but I did and have now evolved my early lists to give me more balance and support than I originally had.
What makes you decide what units you are going to take, or do you only have one list and make that work against all armies? Do you consider what you want to aim for before writing your list, or does it change depending on your opponent? Id like to hear more from you guys, so please feel free to leave a comment.
Subscribe to:
Posts (Atom)
Popular Posts
-
It has taken some time, but finally I have finished the Chaos Space Marines element of the Dark Vengeance box set (released Aug/Sept '...
-
This weeks visit the Marvel Crisis Protocol universe is the Wakandan Erik Killmonger. Another fun and straightforward model to get completed...
-
Excluding their bases I have finally finished painting the 14 Blood Claws for my Space Wolves Army, leaving only a small handful of units le...
-
The Eldar Pathfinders had quickly visited 6 locations in the industrial district of Baston, before disappearing quickly, practically melti...