Showing posts with label Tutorial. Show all posts

Wednesday, 20 February 2013

How I Paint my Gold

Today I am going to tell you how I paint the gold trim, as seen on my Slaaneshi/Emperor's Children.

A very simple recipe, largely borrowed from the guys over at a Tale of Painters, we will need the following paints:

Rhinox Hide, Brass Scorpion, Warplock Bronze, Agrax Earthshade.

Paint the areas you want to be gold with Rhinox Hide to start with, taking care to make sure you do cover all of those areas.

Once that layer has dried, paint over all the previous layer with Brass Scorpion.

Final stage then is to paint the area again with Warplock Bronze and once that has dried, wash over the gold areas with Agrax Earthshade. As a final highlight you can also return to the edges of the gold and use Warplock Bronze again as a highlight.

As I said, it is quite a simple recipe that I am using on these guys. I hope this guide is useful to someone, and hopefully I will be back with finished pictures of this guy and his powerfisted buddy very soon! Thanks for reading.

Thursday, 13 December 2012

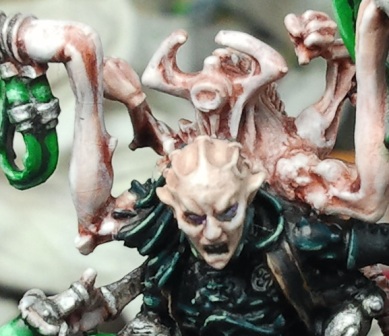
How I Paint my Bone

Today I am going to tell you about how I paint all the bone on my miniatures. It is relatively straightforward and you will need the following paints (or their equivalents) -

Rhinox Hide (GW New Paints)
Filthy Brown (VGC)
Bleached Bone (VGC) or Screaming Skull (GW New Paints)
Agrax Earthshade (GW New Paints)


Coat the area you want to paint bone with the Rhinox Hide, getting a nice solid layer of colour in there.

Next we coat all the lighter surfaces with Filthy Brown, ensuring we leave the darker recesses (nose and eye sockets etc) with just Rhinox Hide covering them.

Then we use the Bleached Bone (or Screaming Skull) to make the bone area look 'whiter'. Again we avoid using the paint in the recesses.

What could be the last step, depending on how far you want to take this, is to wash over the bone with Agrax Earthshade. Let the wash dry thoroughly before you paint anything else in the bone area.

The last step now is to add on some Bleached Bone/Screaming Skull highlights. Or, if you are like me, paint the highlight into the eye socket and not notice until later while looking at the pictures you have taken.

Simple and straightforward, but as the last picture shows, you have to always take care not to put your highlight where you do not want it. I will correct that when I post up pictures of the completed model toward the end of the month.

Hope the How To is helpful, thanks for reading! Any questions or comments please feel free to leave them below.

Sunday, 18 November 2012

How I Paint my Power Weapons

Today I am going to run through how I paint my power weapons.

Paints we will need are:

Night Blue (VGC), Magic Blue (VGC), Nuln Oil (GW), Ice Blue (GW) and Skull White (GW).

Fairly straightforward process, so lets have a look at how.

 Make sure the blade area of the power weapon is black before we start.

Next we put a layer of Night Blue over the whole blade.

Using the Nuln Oil wash over the entire face of the blade.

We will then create a lightning pattern on the blade with the Night Blue, going over this pattern again with a 1:1 mix of Night Blue and Magic Blue.

Over the above pattern we go with a pure Magic Blue layer, keeping inside the previous layers and starting to lighten up the edges of the weapon.

Again we are going inside what we have previously done, this time with pure Ice Blue, focussing on the edges especially.

Pure Skull White next, kept to random bright spots on the weapon face and along the edges. It is possible to leave it at this stage if you are happy with it.

The final step for me was to add a glaze of 3:1 water to Skull White over the entire blade to give it a kind of haze. With this dry, the weapon is complete to go about hacking up your 40k opponents.

Saturday, 17 November 2012

How I Paint my Jump Pack Fire

I thought I would do a guide now on how I paint the fire in my jump packs, which could be transferred across to anything which uses a jet propulsion/engine type set up.

Firstly, we need to get our paints together. The picture shows what we need - Night Blue (VGC), Magic Blue (VGC), Ice Blue (GW), Fenrisian Blue (GW), Skull White (GW) and Drakenhof Nightshade (GW). With all that we can get cracking.

Taking your model, the jet area should already be painted in your general metal colour. Here I have used a mix of Leadbelcher Metal and Black, washed with Nuln Oil.

Using the Night Blue, paint all areas of the jet area, make sure you have covered all the metal that was showing there before.

Use the Magic Blue, keeping it inside the previous layer.

That's right, you are getting the idea now. Fenrisian Grey inside the previous layer.

A final spot of pure Skull White inside the previous layer. If you are happy enough with the finish at this stage you can leave it as it is, but I took it one last step just to tie things together a little more.

Wash the whole areas of the jets with Drakenhof Nightshade to finish off and you are all done. As another extra you could also think of drybrushing around the area of the jets with Scorched Brown (Rhinox Hide with the new paints) and Black to add in the heat effect the pack would be having on the pack.

Wednesday, 14 November 2012

How I Paint my Scrollwork.

Back again today for a quick tutorial on how I paint my scrollwork. No one has asked for this, but this is more of a general note to remind myself how to do it in the future!

For this we will need:

Rhinox Hide (or Charred Brown in VGC)
Bleached Bone
Chaos Black
Agrax Earthshade

To start with paint the scroll with the Rhinox Hide, making sure you get a nice, solid, smooth covering.

Using the Bleached Bone, paint the scrollwork, taking care not to fill in any rips or tears along the edges of the scrolls. This may take a couple of layers to get a nice, solid coat, but keep those layers thin and apply as many as you feel it takes.

With the Chaos Black add random lines/squiggles/dots/squares (you get the picture) to the scroll.

Agrax Earthshade is up next. Using it we wash down the whole of the scroll to give it a dirty/aged look. Make sure you apply wash to all surfaces of the scroll and works its way to all the little rips and tears.

Back to the Bleached Bone now, and using it to highlight all the raised/prominent areas and to highlight around the rips in the scrolls/oath paper. And that is how I do my scrollwork and oath papers.

Tuesday, 13 November 2012

How I Paint my Pink Armour.

As I was asked about the armour I painted on the Helbrute of my previous post, I thought I would get down and put up a quick tutorial on how I did it.

It is hopefully very straightforward and all you need is:

Screamer Pink
Squid Pink (Emperor's Children in the new paints)
Carroburg Crimson.

With these paints amassed it is time to sit down with the model and get some painting done.

First we paint all the areas we want to be pink with Screamer Pink. Try to get a good, solid smooth coat for the base layer.

Next we take the Squid Pink and paint all those areas again, leaving a very small gap between the armour and the trim still showing the Screamer Pink. For my liking, this is too pink, so on to the next step.

Using the Carroburg Crimson, wash over all the armour plates and allow the model to dry. Sometimes I would be happy to leave it there, or see how it looked once the rest of the model was painted, but I took another couple of steps...

Using Squid Pink again, add in highlights on the raised and prominent areas.

Using the Carroburg Crimson, add a light wash around the edges along the trim of the armour and it is all done.

Wednesday, 7 November 2012

Painting Faces

A few posts back I said I was looking to enter something in the Golden Demon competition in 2013. This means I have a little under a year to try and produce something I can enter, knowing I gave it my best shot.

In a series I am going to run over the next few months I am going to look at various areas within the hobby, looking in to all the tutorials out there and creating my own tutorials as I attempt to improve on the current techniques I am using to complete my models. This will cover aspects such as painting power weapons, power armour, free hand symbols, modelling and basing.

First thing to take in to consideration is the model you are painting. For instance, a Dark Eldar Wyche will have a much paler skin tone than that of an Imperial Guard Catachan Jungle Fighter. So bearing that in mind a suitable base can be applied to the face in question.

For my Space Wolf models I tend to go with a Scorched Brown (Rhinox Hide in the new paints) as a base, with a wash of Agrax Earthshade in the recesses and a mix of Dwarf Flesh and White to bring up the highlights. This is then finished off with teethand eyes being painted in white and eyes having a black pupil applied to them.

Within the 40k universe we have many a different race, different armies and all with different ways to produce their faces. Lucius (to the left) for instance was based originally in the Scorched Brown but washed with Leviathan Purple. As his face was brought out to be paler, I added another wash of the purple to all the cuts and scars on his face.

To me the faces of each model are among the most difficult aspect as it is their face that makes them what they are. If those eyes are crossed the model can end up looking like a lurching lunatic, mad and unstable. Get them right and you have a fearsome warrior, serious in the art of war.

With faces you generally have similar areas where shading is required, no matter what race you are looking at. The hairline (if applicable), around the eyes, nose, cheeks and finally both sides of the lips - in toward the teeth and then just above the chin. Of course there may be a couple more such as ears and around any studs or scars on the face. Once these areas are identified the aim is to keep as neat as possible, keep the wash within these areas and add the lighter highlights alongside these darker parts.

As for tutorials, there are a vast amount easily found all over the internet. From The Warp have a few and on the Bolter and Chainsword you can find topics such as Painting Haunted/Pale/Daemonic Faces and Flesh, Painting Human Faces and Face Painting, Step by Step.

And now, to finish off this post, I will run through a quick step by step guide of what I have tried while painting the face of Astorath the Grim.


To start with I added a couple of very thin layers of Dheneb Stone (Rakarth Flesh) to the face of Astorath, allowing each layer to dry fully before I added the next layer.

Next up I added a wash of Nuln Oil to the whole of the face, ensuring that it made its way along the hairline, mouth, eyes, nose and around the areas where the tubes connect into the side of his face.

Once the wash has dried completely I applied a further layer of Dheneb Stone around the face, ensuring it was only painted on to the more prominent areas of the face, leaving the recesses shaded.

Finally another highlight of Dheneb Stone with a very small amount of White was added as a final highlight to the most prominent areas.
And that completes the work on the flesh of the face of the Blood Angel. There is a very small amount of work to carry out on his teeth and I need to apply a fine wash of Seraphim Sepia below his head band, but I will do that when I get around to painting the head band.

As he nears completion I will put up more pictures, hopefully using an interesting tutorial I have found on painting power weapons for his axe and adapting a tutorial for the flame in his jump pack to suit the colour I want to use.

Interesting times ahead, but time in which I want to learn a lot more and really try and improve my painting neatness and accuracy. See you all again shortly!

Tuesday, 7 June 2011

Conversion - Combi-Weapon

Storm Bolter, Flamer, Shoulder Pad
Pretty much every marine army will have combi-weapons in some capacity or other, but the availability of these weapons is pretty rare and can be expensive. The simple solution is to create your own combi-weapons.

We will take a a storm bolter, flamer and shoulder pad to make a combi-flamer for a terminator in this instance, but the method behind it is quite easily transferred across to make either a combi-melta or combi-plasma.


We will begin by taking the storm bolter and trimming off the barrel and all associated bits on the front of the bolter so that we have room to fit the flamer barrel and a repositioned bolter barrel on the front of the weapon. if you manage to remove the barrel cleanly you may want to keep it so that it can be reused as the barrel on the new weapon. Once this is done, clean up the weapon with any necessary filing and place to one side for the moment.


For the next stage we will cut the end from the flamer weapon we have, filing off all uneven edges so that the end section will sit nice and flat on the end of the storm bolter body we have just trimmed and prepared. When they are to our satisfaction we will use plastic glue to join the two bits. The plastic glue doesn't set instantly like super glue and as such gives us some time to reposition the flamer section as we require.

Once the flamer section has been fixed in place we will need to add a bolter barrel to the weapon to finish it off. We can either take a boltgun and trim the barrel from there or use the barrel we cut off earlier and fashion it down to a single barrel. The piece of the barrel will be very small, so be careful not to drop it as finding it again can be incredibly frustrating. This piece can then be added to the front of the storm bolter base.
We can even add in the flamers fuel store by trimming it from the flamer and attaching it in a position you want on the combi-flamer depending on the bolter you are using as your base.

The combi-weapon creation process can be applied to both combi-plasma and comnbi-melta weapons as simply as the combi-flamer. Take the distinctive parts of the special weapon and then mould them into positions on your bolter base. It is quite possible to create any number of different looking combi-weapons, all of which are equally valid within the game itself, so kick back, relax and make the coolest looking combi-weapon you can imagine.

Popular Posts